Step-by-Step Guide to Toilet Installation in London Homes
Toilet installation in London homes might seem like a daunting task, but with the right guidance and tools, it can be a manageable and rewarding DIY project. Whether you're upgrading an old fixture or installing a toilet in a newly renovated bathroom, following a systematic approach ensures the job is done efficiently and correctly. This comprehensive guide will take you through each step of the process, focusing on essential aspects to consider for a successful toilet installation in London.
Why Consider Professional Toilet Installation in London?
Before diving into the step-by-step guide, it's important to recognize the benefits of hiring a professional service for Toilet installation in London. Plumbing issues can be complex, and an experienced plumber can save you time, stress, and potential future repairs. Trusted providers like London Plumbers and Property Maintenance are familiar with local building codes, ensuring your installation meets all regulations. Furthermore, professionals can quickly address unexpected issues, such as improper pipe alignment or low water pressure, which could complicate a DIY installation.
Tools and Materials Needed for Toilet Installation
Having the right tools and materials is crucial for a successful toilet installation in London. Here's a checklist to ensure you're fully prepared:
New Toilet: Choose a toilet that suits your bathroom's design and space requirements. Consider water efficiency and flushing power, particularly in areas with water restrictions.
Wax Ring or Rubber Seal: Essential for creating a watertight seal between the toilet and the floor flange.
Adjustable Wrench: For tightening bolts and nuts.
Screwdriver: To secure the toilet seat and other components.
Level: Ensures the toilet is properly aligned.
Plumber's Putty or Silicone Caulk: To seal the base of the bathroom.
T-bolts and Washers: These are used to secure the toilet to the floor flange.
Water Supply Line: This may need to be replaced if it is old or leaking.
Bucket and Towels: These are used to clean up any spills or leaks.
Step 1: Prepare the Area
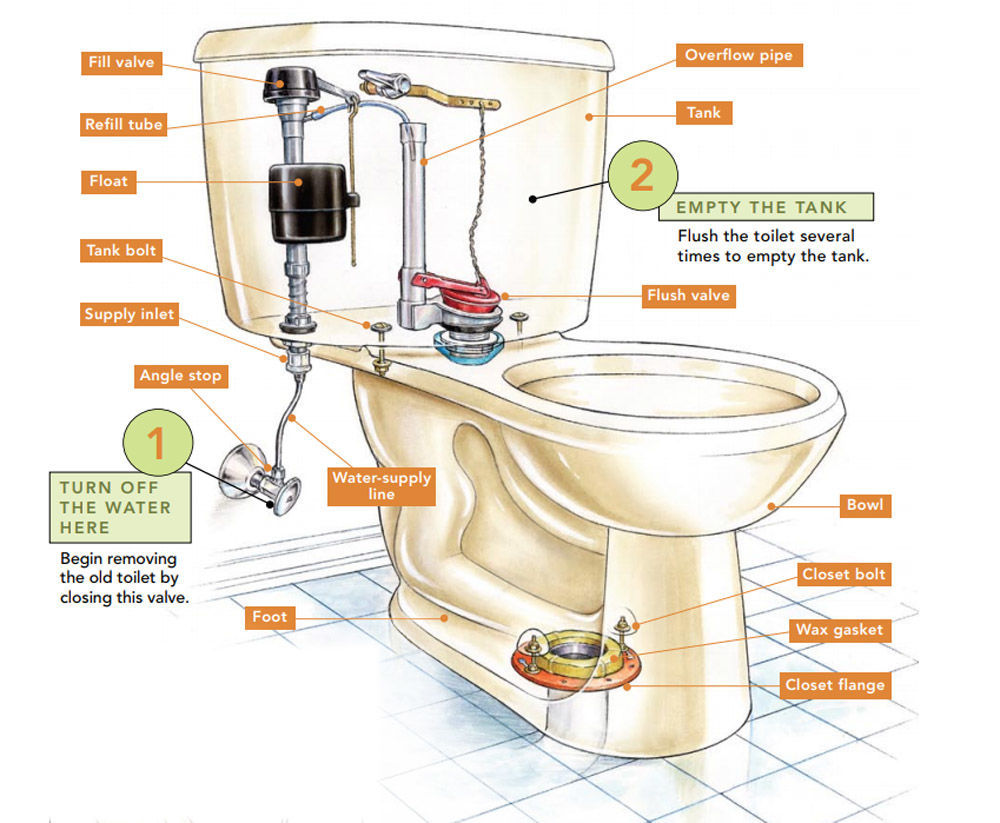
Before you begin the toilet installation in London, turn off the water supply to the bathroom. This is typically done by turning off the shut-off valve situated behind the toilet. Flush the toilet to empty the tank and bowl, then use a sponge or towel to absorb any leftover water. Remove the old toilet by loosening the nuts on the base and carefully lifting the toilet off the floor flange.
Step 2: Inspect the Floor Flange
The floor flange is a crucial component of your toilet installation in London. Inspect it carefully for any cracks, corrosion, or wear. If the flange is damaged, it will need to be replaced before the new toilet is installed. A damaged flange can lead to leaks and an unstable toilet. If the flange is in good condition, clean it thoroughly and place the new wax ring or rubber seal on top of it.
Step 3: Position the New Toilet
Carefully lower the new toilet onto the floor flange, ensuring that the T-bolts pass through the holes in the toilet's base. It's important to align the toilet properly on the first try, as adjusting it after setting it down can compromise the wax ring's seal. Press down firmly to create a tight seal between the toilet and the floor. This step is crucial for a leak-free toilet installation in London.
Step 4: Secure the Toilet
Once the toilet is positioned correctly, use washers and nuts to secure it to the floor flange. Tighten the nuts evenly on both sides to avoid cracking the porcelain. Use a level to ensure the toilet is sitting perfectly horizontally. If the toilet rocks slightly, place shims under the base and trim them as needed. A stable toilet is key to a successful toilet installation in London, preventing future leaks or damage.
Step 5: Install the Tank and Seat
If your toilet comes with a separate tank, now is the time to attach it. Follow the manufacturer's instructions for securing the tank to the bowl, usually involving a few bolts and a rubber gasket to prevent leaks. Once the tank is attached, connect the water supply line to the bottom of the tank. Turn on the water supply and check for leaks around the base and the tank.
Next, attach the toilet seat according to the manufacturer's instructions. Most seats are secured with a couple of screws at the back of the bowl. Ensure the seat is aligned properly and tightened securely.
Step 6: Seal the Base
To finish your toilet installation in London, apply a bead of plumber's putty or silicone caulk around the base of the toilet. This helps to prevent water from seeping underneath and damaging the floor. Smooth the caulk with a damp finger or a caulking tool for a clean, professional look. Allow the caulk to dry according to the manufacturer's instructions before using the toilet.
Step 7: Test the Installation
Once everything is in place, flush the toilet several times to ensure it's functioning correctly. Check for leaks around the base, the tank, and the water supply line. If you notice any leaks, tighten the connections or adjust the seals as needed.
Common Issues and Troubleshooting
Even with careful planning, issues can arise during toilet installation in London. Some common problems include:
·Leaking at the Base: This could be due to an improperly installed wax ring or an uneven floor.Restating the toilet with a new wax ring may solve the issue.
·Water Continuously Running: This might be caused by a misaligned flapper in the tank or an improperly adjusted fill valve. Adjusting or replacing these components should resolve the problem.
·Toilet Rocks or Shifts: If the toilet isn't stable, check for loose bolts or uneven flooring. Adding shims can help stabilize the toilet.
Toilet installation London homes can be a straightforwardtask with the right tools, materials, and a systematic approach. Whether you're confident in your DIY skills or prefer to hire a professional plumber, understanding the steps involved in the process ensures that the job is done efficiently and correctly. By following this guide, you can achieve a successful toilet installation that meets all local regulations and provides years of reliable use.
Frequently Asked Questions
1.What is the average time spent on a toilet installation in London households?
The average installation of a toilet should take 1-2 hours. Nonetheless, it can take more time in case further plumbing services (pipes replacement and floor flange repair) are needed.
2.How much are the average prices of professional toilets installation in London?
Correspondingly, the presumed cost is between £100 and £300 based on the nature of the job, the nature of the toilet and any additional repairs or parts required.
3. Are there any warranties or guarantees given by plumbers regarding the installation of toilets?
Yes, the majority of professional plumbers do come with a warranty/workmanship guarantee. This may take the form of a few months up to a year, which deals with troubles during installation.
4. Will the installation of the appropriate toilet in my bathroom be assisted by a professional installer?
Absolutely. With the appropriate size, water-saving capabilities, and budget, professional plumbers will suggest the right models of toilets that will fit perfectly and perform well in your bathroom.
5. What happens in case of leakages or problems after the installation is done?
You have to get in touch with the installer just in case you find any leakages or issues. And in case it is a warranty issue, they will most likely repair the problem without any additional charges. Meanwhile, switch off the tap to avoid additional destruction.